Next: Using and Managing Data
Up: Introduction
Previous: Accessing Multiseq
Contents
Subsections
Installation
MultiSeq uses a collection
of databases that need to be downloaded to your computer system. The first time you run
MultiSeq you will be asked to create a folder to store these databases as metadata. When you
subsequently run the plugin, it will check to insure that you have the
most recent versions of the databases and Multiseq will ask to download updates as needed. To manualy download
database updates or to change the Metadata directory go to File  Preferences to bring up the
preferences dialog. The directory can be changed in the section entitled Metadata directory: and
each database Multiseq uses is listed underneath with a corresponding Download button for manual downloads.
Preferences to bring up the
preferences dialog. The directory can be changed in the section entitled Metadata directory: and
each database Multiseq uses is listed underneath with a corresponding Download button for manual downloads.
BLAST
Although BLAST is
not necessary for the overall function of MultiSeq, it is highly
recommended to have BLAST installed locally (i.e. accessible through
file browsing on your local computer). However, the newest BLAST release,
BLAST+, is not backwards compatible with BLAST and Multiseq only supports BLAST
versions that are pre-BLAST+. Therefore, this user guide provides steps to installing the lastest
legacy version of BLAST.
To install BLAST:
- Go to ftp://ftp.ncbi.nlm.nih.gov/blast/executables/release/2.2.25/
- Choose the appropriate architecture and OS for your system to download
- Create a directory on your local hard disk into which BLAST will be installed.
- Extract the archive into the directory that you created for BLAST
- You must set the BLAST installation location in MultiSeq. From the MultiSeq program window, choose File Preferences to bring up the preferences dialog.
- Click on the Software button in the upper left portion of the dialog to show the software preferences.
- Click on the Browse... button in the BLAST Installation Directory section and select the directory into which you installed BLAST and make sure to include the bin folder within BLAST in the directory. Note: on Linux and Mac OS X you may have a directory called blast-2.2.25 underneath your installation directory. If so, pick this directory in the browse dialog.
- In the BLASTDB section, you can input a file path to a database that BLAST will use by default. If blank, you must input the directory of the database when using BLAST search from File import data dialog.
Multiseq also uses the PSIPRED algorithm to predict secondary structure of proteins.
To install PSIPRED:
- Go to http://bioinfadmin.cs.ucl.ac.uk/downloads/psipred/
- Download the pripred321.tar.gz file
- Create a directory into which PSIPRED will be installed.
- Extract the archive into the created directory
- Go into Multiseq and choose File Preferences to bring up the preferences dialog
- Click on the software button in the preferences dialog
- In the PSIPRED Installation Directory section, type the path that you have created for PSIPRED
- In the PSIPREDDB section, input the path for a BLAST configured database that PSIPRED will use
Note: PSIPRED also requires PSI-BLAST and Impala software from the NCBI toolkit to be installed and in your PATH to function properly. PSIPRED calls PSI-BLAST by its pre-BLAST+ call blastpgp. If you installed the legacy BLAST mentioned in the previous section, copy blastpgp, impala, and makemat from the bin and place it in the folder PSIPRED calls it from. The default is /usr/local/bin.
Further Note: If you receive an error claiming that PSIPRED is not configured correctly due to not having weight.dat4, you must download a legacy version of PSPRED26 and install it in the same way you did the newest version.
MAFFT
ClustalW is the default sequence alignment tool and is packaged with
MultiSeq. However, MAFFT can be used for doing
sequence alignment if it is installed on your computer system.
To install MAFFT:
- Go to http://mafft.cbrc.jp/alignment/software/
- Choose the appropriate OS and download the zip file
- Unzip and follow the installer instructions
- Using the MAFFT webpage, determine the installation path(i.e. on Mac the path is /usr/local/bin/)
- From the MultiSeq program window, choose File Preferences to bring up the preferences dialog.
- Click on the Software button in the upper left portion of the dialog to show the software preferences.
- In the MAFFT Installation Directory dialog, copy down the instalation path of MAFFT
If you use MAFFT for sequence alignment, note the following:
- MultiSeq has been tested with MAFFT version 6.811. It should work
with any version of MAFFT reasonably close to that.
- MultiSeq uses the default -auto option for MAFFT.
- Profile-profile and sequence-profile alignment will be done with
MAFFT if it is chose as the desired alignment program.
- When configuring the path to MAFFT, you need to give the path to
the `bin' directory on a unix-type system. On Windows, give the path
that contains the `mafft.bat' file.
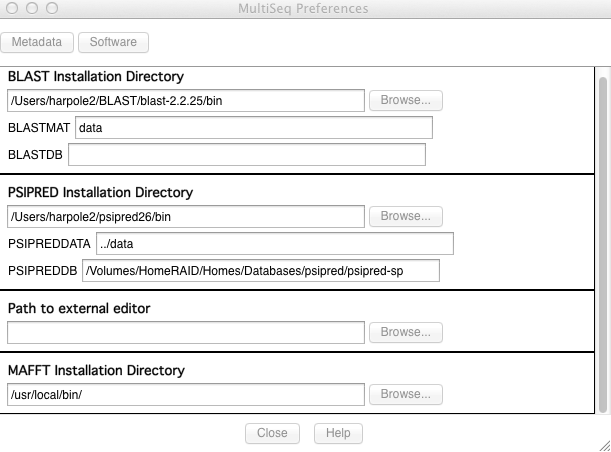
To see an example of what the software preferences dialog should look like, see Fig. 3.
Figure 3:
The preferences dialog should look like this when all programs are installed
|
|
Next: Using and Managing Data
Up: Introduction
Previous: Accessing Multiseq
Contents
multiseq@scs.uiuc.edu